

09 April 2011
Over-dyeing indigo
This was just a small piece of left over indigo dyeing that didn't work overly well so I over-dyed it with red procion dye. I actually quite like the result.

Indigo dyeing yet again
I'm not sure what it is about indigo dyeing but it sure has an addictive quality for me. The pieces below were dyed using the same vat I made up a few weeks ago.


This is one of my pieces above while it was oxidising on the clothes line.

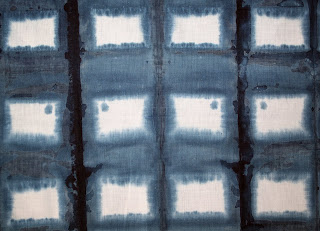
Here is a section of the piece above after finished oxidising and having been ironed.

Another piece oxidising above.

The piece above has finished oxidising and has been ironed.

I clamped 2 pieces of wood on the fabric above after folding it into a tight rectangle. I was disappointed when I opened it up to find there were some little spots on the white area. When I looked back at my wooden blocks I realised one of them had a little hole on it so some dye creeped in.

27 March 2011
Woven Fabric Basket
I made a tiny little woven basket today out of old scraps of my indigo dyed fabric. Below are photos of the steps I followed.
First I cut 1cm wide strips of my fabric (with interfacing for stability) and laid them on a flat piece of paper. I then wove the strips under and over to create the base.

So that my base held its stability i then ironed a rectangle of thick interfacing on the back. It could also be stitched if you wanted.

I then started weaving my first strip around the base of the basket. I used a bit of fabric glue to hold it in a few spots so it was easier to get started.

Because the fabric wasn't overly stiff it made it a bit hard to get the edges to stand up. I had to add a few more dots of glue in a few places so I could work faster.

I then kept weaving strip after strip around the sides to build up the walls.

Once I'd made the walls of the basket as high as I wanted I folded some of the top strips down and cut some of them back.

The photo above makes the edge look a bit messy so I decided it needed an edge to neaten it up. I cut a wide strip of dark indigo fabric and applied lots of glue. I then simply folded it over the edge of the basket.

I neatened up the dark edge on the pic above and so the finished basket is below.

22 March 2011
Indigo dyeing
At work last week I mixed up an indigo vat for our certificate 3 students. The vat didn't have the right Ph level and was playing up. This week I got it working perfectly. Below are some of the photos of the vat and the dying in progress. It is synthetic indigo, I use my own recipe if anyone wants a copy.


This is my very messy looking indigo vat. Works brilliantly!
Below are some photos i took of my work unwrapping. I love the beautiful green colour you get when the fabric is oxidising. If only you could keep the colour mix.


The red tray in the photo works quite well, it was really just there to catch the drips.
This is a photo of one of my students work just hanging on the line.

Now that most of the students have had a chance to do some dyeing, I think I'm going to try and do some myself. I just need to find the time is the trouble. I've done it in past years but I would really like to do some more pieces.
21 March 2011
My published work
Well after my work being accepted some time ago for a Fibre Design book it is now on the TAFTA website. If you click on the link below my work comes on the first 2 pages- Sarah Smith.

I also have my own flickr site with some of my work on it.

20 March 2011
Walk on the beach

I went to the beach for a walk yesterday and took a few photos while there. There was this gorgeous piece of rusty pipe that had really nice colours on it.

This was a cool rock that I thought looked like a face.
Subscribe to:
Posts (Atom)