I was looking over my posts in the last few weeks and putting some thought into why I write a blog. I'm not sure about some of the content I've posted recently in terms of whether or not it is of interest to other people. When I really think about it however, my blog isn't something that I just write for other people.
I have always wanted to keep a diary, but being more of a visual person I found it boring just writing. I always wanted to include photos as well and so for me, a blog is perfect. I love my sketchbooks and drawing etc. in them but it is still different.
I had started to think some of my past posts were a bit boring and pointless. I then thought about why I posted them. For me it is like a record of my thoughts, etc. If someone else reads my blog and finds something interesting or useful then that is great. I am a teacher by profession and so I love sharing my thoughts and passions with others. This blog will always continue to be a mixture of things to me. A place to record thoughts, share images I like, show my work and share my love and knowledge with others. Of course everyone really wants other people to read their blog, it is satisfying to know that others appreciate what you write, post, etc.
After just reading what I wrote above I think I might be a hypocrite. Yes I write my blog for myself but I do also write content that I hope interests others and I enjoy knowing that people like what they read.
Before I talk around in circles anymore I think it is time to eat dinner.

29 July 2012
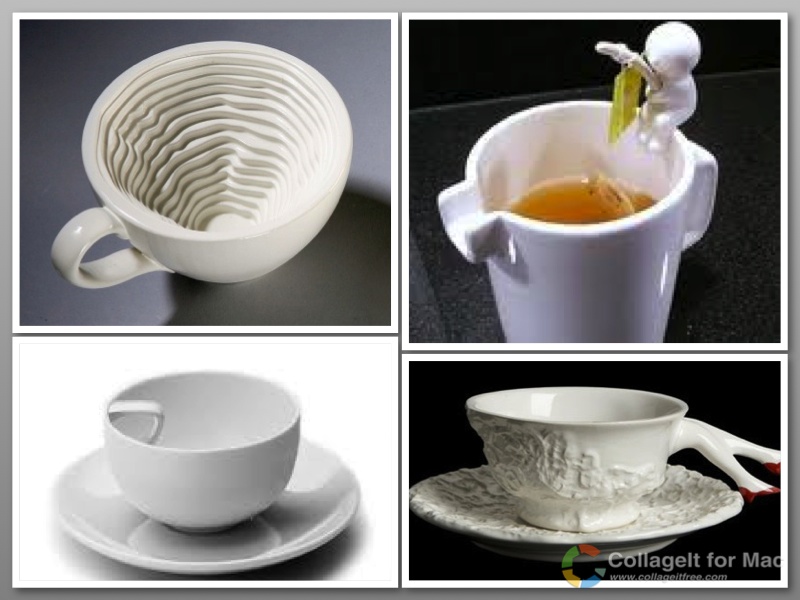
Different uses for teacups
Below are some more images I found in my Alice in Wonderland search. I love the different uses for teacups.


27 July 2012
Incredible use of teacups, etc.
I first saw this artists work quite a while back. I fell in love with it and found it purely awe inspiring. I'm sure some of you have seen images of the work already.


The name of the artist is Li Xiaofeng. I've pasted images below of his work along with a statement about his work. I have also included the link to a website that has a really great interview with the artist.
Who knew what could be achieve with broken teacups and plates...
Li Xiaofeng trained as a muralist but turned to sculpture to explore a new concept and expression of Chinese landscapes. His choice of material is unexpected; instead of marble, wood or even glass, he prefers buying shards of broken porcelain recovered from ancient archeological digs, some dating from the Ming Dynasty, and then shaping and polishing them, drilling holes into each corner and linking them together with silver wire to create ’rearranged landscapes’. It is fitting that these poetic pieces, which have been perhaps best described as ‘post-orientalism’, usually take the form of clothing, including traditional Chinese dresses and jackets as well as neckties and military uniforms. They are ultimately ‘wearable’ although certainly promise to be as heavy as any armour and would require a strong retinue of dressers to don and doff.


25 July 2012
Alice in Wonderland themed student work
I decided all my art students would work to a set theme this semester. It allows students to become fully immersed in the topic, as they see what other classes are doing and feel a connection to the work.
The theme is Alice in Wonderland. The students absolutely love it.
My year 7's are making paper mache hats and then teapot/teacup clay mobiles.
My year 8's are making patterned teacups/teapots in watercolour and pen and ink. They are then making clay mushrooms.
My other year 8's are making 'Alice' clay characters plants that have their own facial characteristics.
My year 9s are making teacup/teapot collages and then 3D teacups/teapots.
My year 10's are painting an Alice in Wonderland theme mural and then making giant concrete painted teacups.
During the course writing I have done lots and lots of reserach. I have found some really great images along the way and want to share some with you. I'm also hoping to get permission from my school to be able to post photos of students artwork on here as well.
Below are some images of the fantastic teacups I've discovered in my searching.


22 July 2012
Photos of myself with my sewing machines
I needed to get some photos taken of myself and my sewing machines for some work that I have been doing. I got my husband to take these for me today.
The machine on the right is called 'Barry the Bernina' then there is 'Bettina the Bernina' in the middle and the overlocked is called 'Brian the Bernina'.
Barry used to be a high school sewing machine who had a very hard life. He then got a second chance when my mum bought him and had him for about 10 years. Barry then got passed down through the family to me. Barry and I have had a good relationship over the years, he can sew through anything and I don't think I could break him if I tried. He caught on fire once and had smoke pouring out the top of him. We simply pulled out the burnt bits, put him back together and he hasn't missed a beat since. He just goes a little bit slower, he is fairly old so this is understandable.
Bettina was purchased around the time of the 'great Barry fire'. No offence to Barry but I decided it was time to have a second machine and one that was a bit more modern. I generally swap between the two machines I"m working.
Brian is the latest addition to the family and is more of a 'get down to the hard work' kind of machine. He's a no mess kind of machine. Hard worker, but not much personality.
I love my machines, I can honestly say that Bernina are the best machines I have ever used. Being a teacher, schools often have different brands of machines. I come back to the Bernina every time as the most reliable, tough, hard wearing and easy to use machines. My school has 25 Bernina sewing machines and 3 Bernina overlockers. It suits me perfectly.
All five of my aunties have Bernina's and my Dad even has his own. He uses his for making truck tarps and silo covers.
I think you get the point by now as to what type of machines I like.

This is one of the better photos. I hate smiling for photos.

I thought I'd include this one to show how the whole family
was trying to help out.
21 July 2012
My work in an exhibition at Pepper Street Gallery
Below is a digital version of the invite for an exhibition called 'In your backyard'. I have a piece of work in this exhibition, the gallery details are on the invite.


14 July 2012
How I work through an idea- Part 6
After pages and pages of planning I eventually make the final piece. Please note as I said earlier, I only show a portion of the pages here as the others still contain ideas I wish to explore further. I have only shown approximately 1/3 of the pages I actually completed.
Below is the finished work. I'm rather fond of this piece, you will notice it is the header on my blog and it also features on items such as my business card.
Please let me know if you have any questions regarding the process I have documented in these past few posts.

Below is the finished work. I'm rather fond of this piece, you will notice it is the header on my blog and it also features on items such as my business card.
Please let me know if you have any questions regarding the process I have documented in these past few posts.

11 July 2012
Paper collection
I was cleaning in my studio last week and found some of my paper collection. Over the years I have bought pieces of paper always intending to use them for something. As with lots of my collections, I never actually use the items and they just get stored away. The images below are of just a few of the papers I have waiting to be used.


10 July 2012
How I work through an idea- Part 5
When I have worked out the basics of my work (this was done through making test pieces), I then do some more in-depth planning into how the overall piece will come together. This includes working out how my piece will be mounted/displayed. I experiment with display ideas such as stretching on canvas, traditional quilt backing, traditional picture framing, etc.
The mounting/display of a work is extremely important. It can make a work successful or an utter failure. I make my pieces so that they are not tied down to one type of mounting/display, this way I can change my mind as I go.
Below are two sketchbook pages showing ideas for mounting/displaying my work.

Thinking about mounting/display options

Final work almost organised.
07 July 2012
How I work through an idea- Part 4
Making samples is one of the biggest and most important parts of my work. It is at this point that all my planning starts to come together.

once again I write ideas to go with my samples so that I don't forget my thoughts

often when I start making samples I find things are not really working out how I planned. I will then stop and go back to drawing again and often do some more research.

once again I write ideas to go with my samples so that I don't forget my thoughts

often when I start making samples I find things are not really working out how I planned. I will then stop and go back to drawing again and often do some more research.
04 July 2012
How I work through an idea- Part 3
Once I have refined my concept via drawings it is time to start looking at fabrics.

some of the fabrics that interest me

samples that explore some of my ideas. I often write comments to go with them so I don't forget what I was thinking

some of the fabrics that interest me

samples that explore some of my ideas. I often write comments to go with them so I don't forget what I was thinking
03 July 2012
How I work through an idea- Part 2
Once I have collected lots of research images and done my basic drawings/written comments, I then start to refine my ideas.

more in depth drawings trying to refine my
ideas

drawings that stem from the ideas I got during my research

looking at colours and more concept development
Subscribe to:
Posts (Atom)